The Views feature allows you to define, then quickly and easily access specific areas of the model layout. Selecting a view scrolls the layout window and adjusts the zoom so you see a specific region of the layout regardless of the layout window’s size. Once a view is defined, you can select it while editing or running the simulation by selecting the view from the View menu or by using the keyboard shortcut.
With the Views dialog open, select the area in the layout window you want to define as a view using the scroll bars and zoom feature in the View menu. Or size the layout window to the desired view.
Please Note: Views cannot be defined at run time.
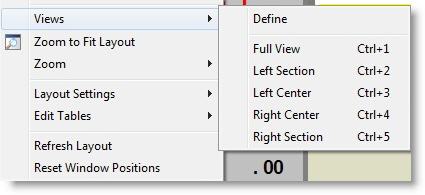
How to select a view from the menu:
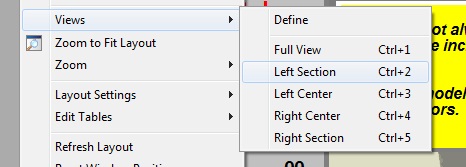
How to select a view with shortcut key CTRL + n:
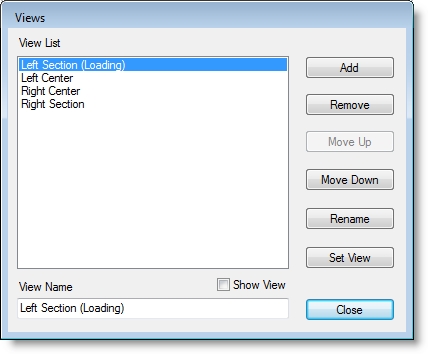
When you click on Define from the Views menu, the Views dialog is displayed. It lists the defined views in the Views List and provides buttons for adding views, removing views, and managing the list. The function of each button is described next.
Add Adds the view, which you have named in the View Name field, to the list of views.
Remove Deletes the currently highlighted view from the View List.
Move Up Moves the currently highlighted view up one position in the list creating a corresponding change to the menu and CTRL+ n order.
Move Down Moves the currently highlighted view down one position in the list creating a corresponding change to the menu and CTRL+ n order.
Rename Renames the currently selected view to the name you have typed into the View Name field.
Set View Sets the highlighted name in the View list to the portion of the model currently visible in the Layout window.
View Name This is the field where you type the name of the view you wish to add.
Show View Checking this box will cause your views to be displayed in the Layout window as you select them in the list.
When the simulation is running, you may choose the active view by picking its name from the Views menu or the Views Panel.
The Views menu is accessible during run-time from either the Menu Bar’s Option menu or the Right-Click menu.
The Views menu will display a list of your defined views. There is also an option to open the Views Panel.
The Views Panel is a dialog window with a list of your defined views.
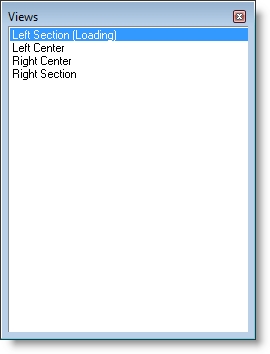
The Views Panel may be moved or resized, and will remain on top of the simulation window until the Panel is closed.
Simply click on the name of a view in the Panel to switch to that view.
Once a view has been defined, it may be referenced in the model using the VIEW statement (e.g., VIEW “Service Office”). This is useful for illustrating certain parts of the model at specific times during run-time. For syntax and examples, see View.

|
© 2012 ProModel Corporation • 556 East Technology Avenue • Orem, UT 84097 • Support: 888-776-6633 • www.promodel.com |